Vesikalık fotoğrafçılıkta nasıl ustalaşılır: Ivan Weiss'tan uzman ipuçları
Oyunculuk profilleri, LinkedIn veya şirket web siteleri için profesyonel vesikalıklar mı çekmek istiyorsunuz? Londra'da yaşayan portre fotoğrafçısı Ivan Weiss, bu rehberde lens seçimi ve ışıklandırmadan müşterilerle yakınlık kurmaya ve kişilikli ve derin görüntüler yakalamaya kadar her konuda uzman ipuçları paylaşıyor.
Vesikalık ile portre arasındaki fark nedir?
Bu soru sorulduğunda insanlar genellikle "Bu vesikalık değil, portre" der ve görselin neye benzediğine odaklanır. Ancak temel fark gerçekten kullanıma dayanıyor. Tüm vesikalıklar portredir, ancak siz onları bu şekilde kullanmadığınız sürece, tüm portreler vesikalık değildir.
Vesikalık fotoğraf, insanların kendilerini profesyonel olarak tanıtmak için kullandıkları bir şeydir. Eskiden daha çok sahne sanatlarında çalışanlar kullanırdı, ancak günümüzde ister web sitesi, ister LinkedIn profili veya CV için olsun, neredeyse herkesin bir vesikalık fotoğrafa ihtiyacı vardır. Buna aktörler, müzisyenler, girişimciler ve her türlü profesyonel dahildir.
Güzel bir vesikalık fotoğraf, izleyiciye doğru duyguyu da aktarmalıdır. Örneğin bir tıp uzmanının fotoğrafı, güven ve itimat hissi vermelidir. Bir aktörün veya müzisyenin vesikalık fotoğrafı, merak veya heyecan uyandırabilir.
Vesikalık fotoğraf çekimi hazırlığı nasıl yapılır?
Gerçekten etkili bir vesikalık oluşturmak için öncelikle vesikalık fotoğrafın amacını ve kimi çektiğinizi anlamanız gerekir. Ne iş yapıyor? Vesikalık fotoğraf ne için gerekli? Ve hangi mesajı ya da izlenimi iletmeye çalışıyor?
Yarattığım vesikalıkların çoğu, aktörler, dansçılar ve müzisyenler gibi sahne sanatlarında çalışan insanlar için ama aynı zamanda yazarlar, girişimciler ve işleri sadece performansa değil güvene, varlığa ve bireyselliğe bağlı olan profesyonellerle de çalışıyorum. Her durumda amaç, net bir amaca hizmet eden ve onları kullanan kişiye özgün gelen görüntüler oluşturmaktır.
Birisi benden bir çekim randevusu aldığında, önceden biraz araştırma yapıyorum. Kim olduğuna ve ne yaptığına dair genel bir fikir edinmek için onu internette araştırabilirim, ancak yeniden markalaşmak veya imajlarını tamamen değiştirmek isteyebileceği için bunu yüzeysel şekilde yapıyorum. Stüdyoya geldiğinde, çekimle ilgili hedefleri ve beklentileri de dahil olmak üzere tüm bunları konuşuyoruz. Bu erken konuşma, çekim seansının yönünü şekillendirmek için çok önemlidir.
Çekim sırasında müşterilerle çalışma
Bir fotoğrafçı olarak, müşterilerinizin söylediklerini gerçekten dinlemek ve aynı zamanda satır aralarını okumak önemlidir. Çoğu zaman, insanlar ne istediklerine dair net bir fikirle gelirler, ancak süreç boyunca, daha otantik hissettiren veya vesikalık fotoğrafın iletmesi gereken şeyi daha iyi yansıtan tamamen farklı bir şey keşfederler.
İş akışımın en önemli parçalarından biri, fotoğraf makinesini bilgisayara bağlayarak çekim yapmak. Bu işlem, müşterilerin görselleri gerçek zamanlı olarak görüntülemesine olanak tanıdığından, seans ilerledikçe birlikte karar verebiliriz. Ayrıca güven inşa etmek için de harika bir yoldur. İnsanlar ekranda iyi göründüğünü gördüğü an biraz rahatlamaya başlar. Müşterilerin kendilerinden şüphe duydukları o ilk anı atlatmalarını sağlamak, işin en ödüllendirici kısımlarından biridir.
Benim rolüm müşterinin istediğini sunmak olsa da, gerçekten işe yarayan bir çekim için süreç boyunca onlara rehberlik etmek de aynı derecede önemlidir. İşte bu noktada işbirliği, sezgi ve esnek bir yaklaşım fark yaratır.
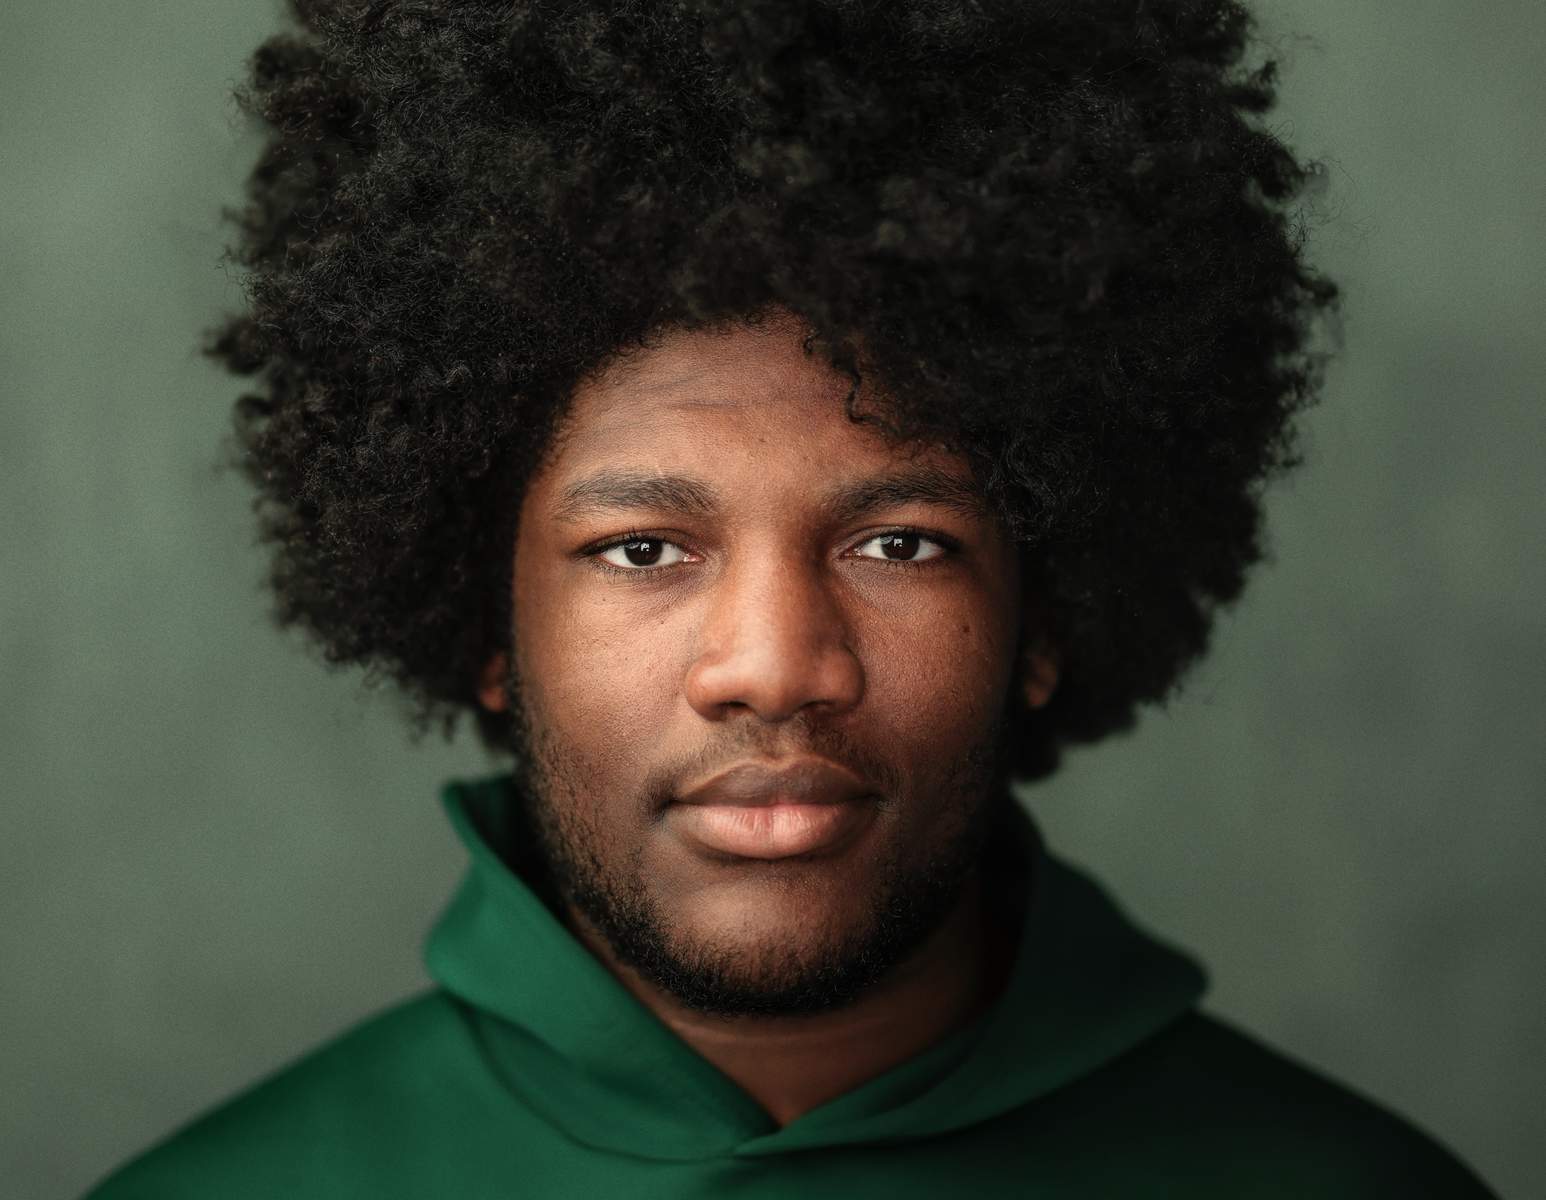
Vesikalık fotoğraf çekiminde mesafe ve lens seçimi
Vesikalık fotoğrafçılıkta yakınlık son derece önemlidir ve genellikle kompozisyon ve lens seçimiyle ilgili kararların başlangıç noktasıdır.
Öznenizle aranızdaki mesafe, nihai görselin bakan kişiye nasıl bir his vereceğini doğrudan etkiler. Öznenizden çok uzakta durursanız, yakınlaştırsanız bile kendilerini uzakta hissedeceklerdir. Uzaktan fotoğrafı çekilen bir kişi daha çekingen veya mesafeli de görünebilir; bu da birini bir lider veya örnek alınacak biri olarak sunmak istediğinizde olduğu gibi belirli bağlamlarda işe yarayabilir. Ancak daha ulaşılabilir bir his yaratmak istiyorsanız, nesnenize yaklaşmanız gerekir. Bu genellikle daha kısa bir odak uzaklığı kullanmak anlamına gelir. İyi bir temel kural, bir esnafla sohbet ederken ne kadar uzakta duracağınız gibi normal bir konuşma mesafesinde kalmaktır.
Odak uzaklığı ile başlamak yerine, önce mesafe ve psikolojik yakınlık, öznenin fotoğrafı gören ne kadar yakın hissettireceğini düşünüyorum. Farklı lensler, çerçeveyi şekillendirirken bu ilişkiyi korumama yardımcı oluyor.
İşte kompozisyona bağlı olarak en sık kullandığım odak uzaklıkları:
- Dar baş ve omuz çekimleri için 85 mm
- Üst gövde veya belin daha fazlasını içerdiğinde 50 mm
- Çevreyi daha fazla göstermek veya kasıtlı olarak perspektif hissi vermek istediğimde 35mm
Vesikalık fotoğraf için aydınlatma ipuçları
Aydınlatma seçimleri her zaman görüntünün nasıl algılanması gerektiğine göre yapılmalıdır. Bazı durumlarda bu açıklık ve güvence, bazı durumlarda ise otorite, derinlik veya belirsizlik anlamına gelir. Ağır gölge görsel olarak çarpıcı olabilir, ancak görüntünün iletmesi gereken mesajla çelişiyorsa güveni de zedeleyebilir.
Düz aydınlatma açık ve dürüst hissettirebilir, ancak genellikle görsel ilgiden yoksundur. Birini ulaşılabilir olarak sunmak istediğimde, z ekseni boyunca gölge kullanıyorum. Bu, yüzün ön tarafının, yani kameraya en yakın kısmının daha parlak olduğu anlamına gelir. Kontrast yaratır ve gözler, kaşlar, ağız ve burun gibi yüzün en etkileyici bölgelerine gölge düşürmeden görüntüyü daha ilgi çekici hale getirir. Doğru dengeyi bulmak çok önemlidir.
Diğer bağlamlarda gölge, gizem veya gerilim duygusu katarak izleyiciyi görsele anlam yükleyerek ve onunla daha aktif bir şekilde ilgilenmesini sağlayabilir.
Fotoğrafı görenlerin bu iş için doğru kişi, ya da sanatçılarda biraz üstünlük, drama veya entrika içeren biri olduğunu hissetmelerini istersiniz. Tabii ki, söz konusu diş hekimleri olduğunda, tehlikeden uzak durmak en iyisidir!
Vesikalık fotoğraflarda kişilik nasıl yakalanır?
Kesin bir formül olmamakla birlikte, özellikle de fotoğraf çektirmeye alışık değillerse, çoğu müşterinin fotoğrafçıyla belli bir düzeyde yakınlık hissetmesi gerekir. Vesikalık fotoğrafta amaç, bir anlığına da olsa kamerayı unutmalarına yardımcı olmaktır. O kısacık özgünlük anı büyük fark yaratabilir. Müşterinizle konuşun. Onunla etkileşime geçin. Gerektiğinde yönlendirin. Eğer kameranın karşısındaki kişiyle aranızda gerçek bir bağ yoksa, fotoğrafın da bağ yansıtması pek olası değildir.
Vesikalık fotoğraf çekimlerinde, kişinin nasıl göründüğünden çok nasıl hissettiğine odaklanılmalıdır. Bu duygusal varlık, görüntüye derinlik ve kişilik kazandıran şeydir.
Farklı müşteriler için vesikalık fotoğraflara nasıl rötuş yapılır?
Temelde birini olmadığı bir şeye dönüştürmek yerine dikkat dağıtıcı unsurları ortadan kaldırmak için tüm rötuşlarımı Affinity'de yapıyorum. Renk, kontrast ve ton, bir görüntünün sadece nasıl göründüğünü değil, nasıl hissettirdiğini de şekillendiren araçlardır.
Bir finans danışmanının web sitesi için bir çekim düzenliyorsam, onları oldukça doğal bir şekilde sunmak istiyorum, bu yüzden ciltlerinin gerçekçi göründüğünden emin olmak için Affinity'nin renk araçlarını kullanırım. Öte yandan, bir müzisyen için daha dramatik bir görüntü oluşturuyorsam, aynı araçları farklı bir ruh halini şekillendirmek için kullanabilirim. Bu durumda, doğrulukla daha az ilgileniyorum ve daha çok görüntünün nasıl bir his verdiğine odaklanıyorum.
Doğruluk önemlidir, ancak amaç bu değildir. Amaç tutarlılık, yani her kararın görüntünün amacını ve onu kullanan kişinin nasıl algılanması gerektiğini desteklediğinden emin olmaktır.
Uzun eğitimimde ele aldığım post prodüksiyon iş akışı ve kullanıma sunduğum LUT paketleri, günlük çalışmalarımda kullandığım araçlar ve karar verme süreçleri kullanılarak tamamen Affinity'de geliştirildi.
Vesikalık fotoğrafçılık hakkında daha fazla bilgi edinmek isterseniz headshotcrew.com adresini tavsiye ederim, Burada düzenli olarak zanaatla ilgili derinlemesine tartışmalar ve eğitimler paylaşıyorum.
Katılımcı hakkında
Ivan'ın fotoğrafçılığa yaklaşımı, klasik kompozisyon ve portre sevgisinin kök saldığı Floransa'da yaşadığı on yılı aşkın süre boyunca şekillendi. 2011 yılından bu yana, ister sanatçıları, profesyonelleri ister girişimcileri fotoğraflıyor olsun, teknik hassasiyeti duyguyla birleştiren görseller yaratmasıyla ün kazandı.
Ivan, web sitesinde, kapsamlı bir eğitim videosu ve Affinity tabanlı bir iş akışı etrafında oluşturulmuş renk araçları da dahil olmak üzere derinlemesine eğitim kaynaklarını da paylaşıyor.
Çalışmalarından ve eğitim kaynaklarını görmek için ivanweiss.london adresini ziyaret edebilirsiniz, Instagram veya headshotcrew.com.


